
Working from a remote (not-in-office) setting can be typical of many jobs. However, when we’re dealing with sensitive work data and sizable equipment, we quickly realize that we can’t just slide a 30-pound desktop computer into our bag and be on our way.
Setting up a remote connection to a computer located in a different physical location allows you to use that exact computer from a different personal computer. Your personal computer essentially becomes a magic mirror in which you can log into your far-away computer and use the applications/documents normally. It’s a simple process, and works cross-platform for both desktops and laptops (tldr; version at the bottom).
To start off, you’ll need to download a remote access software on the computer you’re remoting from. For Windows, GlobalProtect and Cisco AnyConnect are popular choices. On Mac, I use Microsoft Remote Desktop which you can find in the App Store.
After the software is installed, you need to check a few things on the computer that you want to be accessing into. If your work computer is connected to your workplace’s Ethernet and needed to have its MAC (physical) address registered in order to receive a connection, go into the registration details of your computer and ensure that it has a static IP. What this means is that the computer won’t be getting randomly changing physical addresses assigned to it; with a static IP, this means that your work computer is bound to one specific (and unchanging) address. This is necessary because you need a reliable IP that points to this computer every time you want to connect to it.
On the same computer (the presumable work computer that we want access into), open Control Panel. From there, navigate to:
Control Panel → Users → “Allow Remote Access” → “Add user”
→ Open Browse to search for your ID on the domain, and add yourself to the list of allowed users
Now, we’re going to switch to the computer that you’ll be remoting from.
Windows:
If you’re using GlobalProtect, you’re going to want to open that application first and configure the gateway portal if you have one. The gateway portal will usually be a domain address, usually one that corresponds to a shared domain that you’re working from.
Then, open Windows Remote Desktop Connection (should be a default program). Enter the static IP Address of the computer that you’re remoting into. The display on your personal computer should immediately change to reflect the login screen of the remote computer.
Mac:
Open Microsoft Remote Desktop and select the ‘ + ‘ button from the top navigation bar (pictured below).

In the drop-down menu, select ‘Desktop‘.
The following configuration screen will pop up:
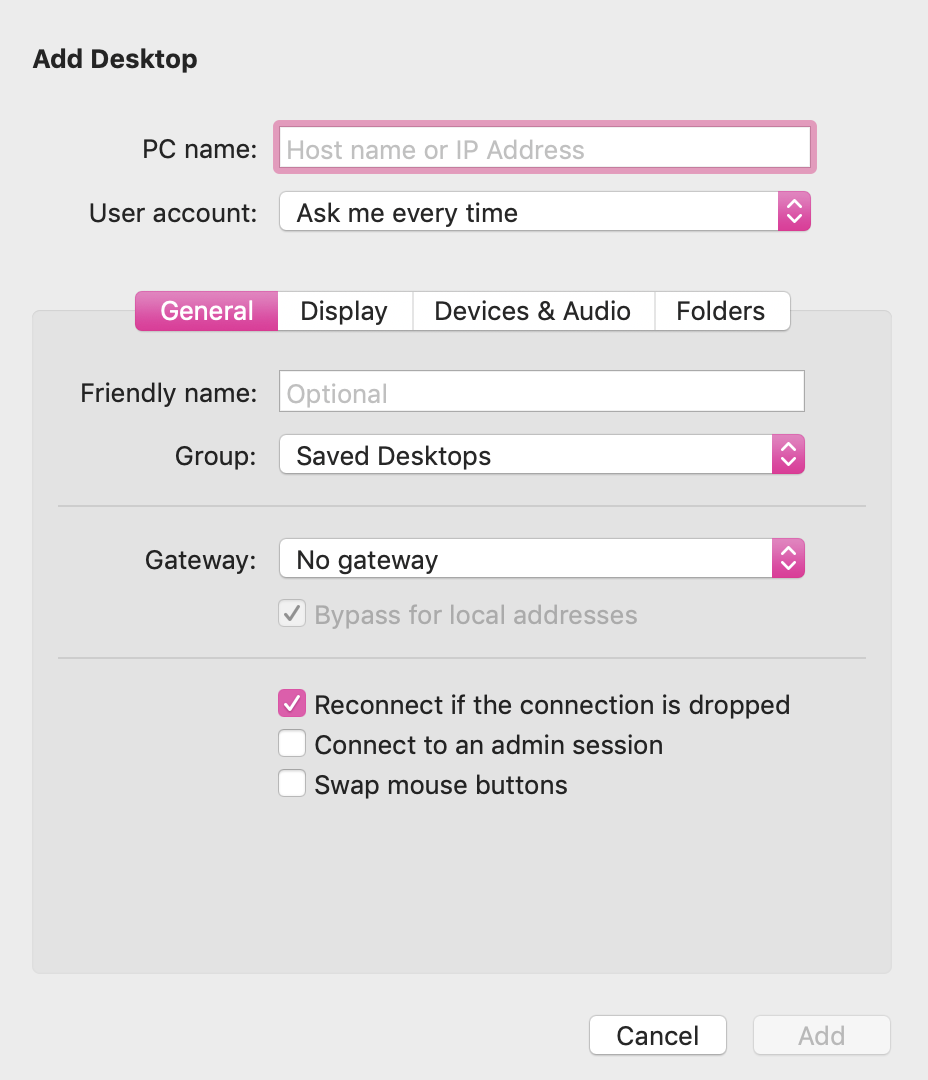
Enter a gateway portal (if any), and the static IP address. After you add the desktop, feel free to add it to the ‘Saved Desktops’ group for easy access. To access the remote desktop, navigate to the main landing page of the application, and you should be able to see the added desktop. Simply double-click to connect.
— tldr; —
- Remote desktop connections are essential to working remote and still accessing your data
- Download a remote access application; would recommend GlobalProtect (Windows) and Microsoft Remote Desktop (Mac)
- Check that the network registration (if any) of the computer you want to remote into is static IP
- On the computer that you want to remote into
- Control Panel → Users → Allow Remote Access → Add user → Browse for person’s ID on your domain
- On the computer that you want to remote from
- Open the GlobalProtect application, and configure the gateway portal (usually related to your shared domain)Open Windows Remote Desktop Connection, and enter the static IP address of the computer being remoted into
- For Mac, complete the above two steps in the Microsoft Remote Desktop application after clicking the ‘ + ‘ to add a ‘Desktop‘ in the navigation bar

Thanks! Helped a lot😁
LikeLike